Plumbing often involves working in cramped spaces, where regular tools just don’t fit or work efficiently. One of the common challenges faced by plumbers and DIY enthusiasts is cutting copper pipe in such tight confines. Given copper’s significance in plumbing for water supply and other utilities, this task is indispensable. However, with the right tools and techniques, you can navigate this task with precision and ease. This guide delves into the various methods to cut copper pipes in tight spaces, ensuring a clean cut without causing damage to the surrounding area. Whether you’re a seasoned plumber or a homeowner tackling a DIY project, these tips will ensure you’re well-equipped for the task ahead.
How To Cut Copper Pipe In Tight Space?
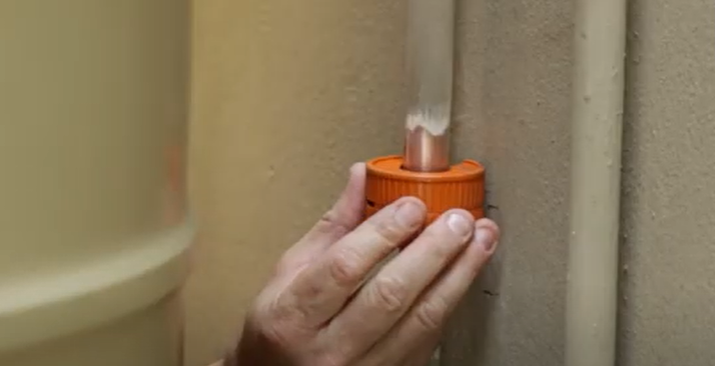
Method 1: Using Compact Pipe Cutter:
Step 1: Identify the Need: If you’re working in a small area where larger pipe cutters won’t fit, you might need a compact cutter, especially when copper pipes are close to the wall.
Step 2: Select the Right Tool: Look for a compact cutter designed specifically for the size of your copper pipe (e.g., a half-inch copper pipe). The tool should have two rollers for the pipe to roll around on and a spring-loaded cutter.
Step 3: Mark the Pipe: Before making a cut, mark the section of the copper pipe where you want to make the cut.
Step 4: Align the Cutter: The compact cutter typically has lines on each side. Align these lines with the mark you made on the pipe.
Step 5: Insert the Pipe: Push the marked section of the pipe into the tool until it pops in place.
Step 6: Initial Turn: First, turn the tool in the opposite direction of the cutting direction (clockwise). This will create a light mark on the copper to ensure you’re aligned correctly.
Step 7: Make the Cut: Once you’ve confirmed your alignment, start turning the tool in the cutting direction (as indicated on the cutter, e.g., counterclockwise). After a few turns (usually three or four), the pipe should be cleanly cut.
Step 8: Check the Clearance: When the pipe is inside the cutter, ensure you have some clearance between the wall and the pipe (around three-quarters of an inch) to make the cutting process easier.
Step 9: Finish: After cutting, inspect the pipe to make sure it has a clean cut.
Method 2: Using the Restricted Access Tool with Monument Auto-Cut:

Step 1: Position: Place the restricted access tool underneath the pipe.
Step 2: Engage: Fit it over the top of the monument auto-cut.
Step 3: Handle Engagement: The handle of the restricted access tool should engage with the knobs on the outer side of the auto-cut.
Step 4: Rotate: Begin rotating the restricted access tool. As you rotate, the internal wheel of the monument auto-cut will start cutting through the pipe.
Step 5: Continue Rotation: Ensure that the tool completes its rotation around the pipe.
Step 6: Finish the Cut: As you reach the end of the rotation, you’ll feel the pipe slice or cut through completely, allowing the section of the pipe to drop away.
Step 7: Inspect: Check to ensure a clean, neat cut on the pipe.
Step 8: Disengage: After completing the cut, remove the restricted access tool from the monument auto-cut.
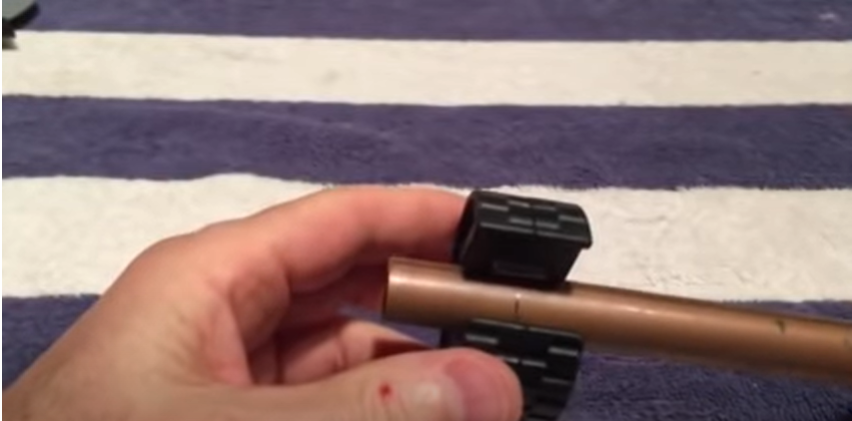
Method 3: Using the Otto-Cut Half-Inch Cutter:
Step 1: Purchase the Tool: Acquire the Otto-cut half-inch cutter from Husky. This specific tool is found at Home Depot, as mentioned.
Step 2: Understand the Design: The cutter is C-shaped and has an arrow indicating the direction in which you should rotate it. There are lines in the middle of the cutter; these help you align it correctly on the pipe.
Step 3: Mark the Pipe: Before placing the cutter, mark the spot where you want to cut the pipe using a Sharpie or similar marking tool.
Step 4: Position the Cutter: Align the middle lines on the cutter with the mark you’ve made on the pipe. Ensure the cutter is positioned in a way that it clamps securely onto the pipe.
Step 5: Rotate the Cutter: Hold the tool steadily with one hand (be careful if you’re working near gaps or spaces where the tool could fall). Apply slight pressure and begin rotating the cutter clockwise, following the direction of the arrow.
Step 6: Complete the Cut: Continue rotating until the pipe snaps, ensuring a clean cut.
Step 7: Deburr the Pipe: After cutting, there might be some rough edges. Use a deburring tool (or your old cutting tool, if it has a deburring feature) to smoothen these out.
Method 4: Using Tin Snips To Cut Copper Pipe:
Step 1: Gather Materials: Ensure you have tin snips and a marker or Sharpie on hand.
Step 2: Mark the Pipe: Place your desired cutting mark on the copper pipe using the marker or Sharpie.
Step 3: Position the Tin Snips: Choose either end of the snips based on what feels most comfortable for you. It’s essential to have a firm grip for better control.
Step 4: Begin the Cut: Start making small cuts along the marked line. It’s crucial to maintain these cuts as small and controlled as possible.
Step 5: Avoid One Long Cut: Do not attempt to make one continuous or giant cut. This approach can lead to an uneven or jagged edge.
Step 6: Continue Cutting: Work your way around the pipe, making these small cuts until you’ve covered the entire circumference.
Step 7: Snap the Pipe: Once you’ve completed the cuts all the way around, gently bend the pipe back and forth along your cuts. This action will weaken the metal further.
Step 8: Break Off the Section: After sufficient bending, the piece should snap off, giving you two separate pieces of pipe.
Method 5: Using A Hacksaw To Cut Copper Pipe:
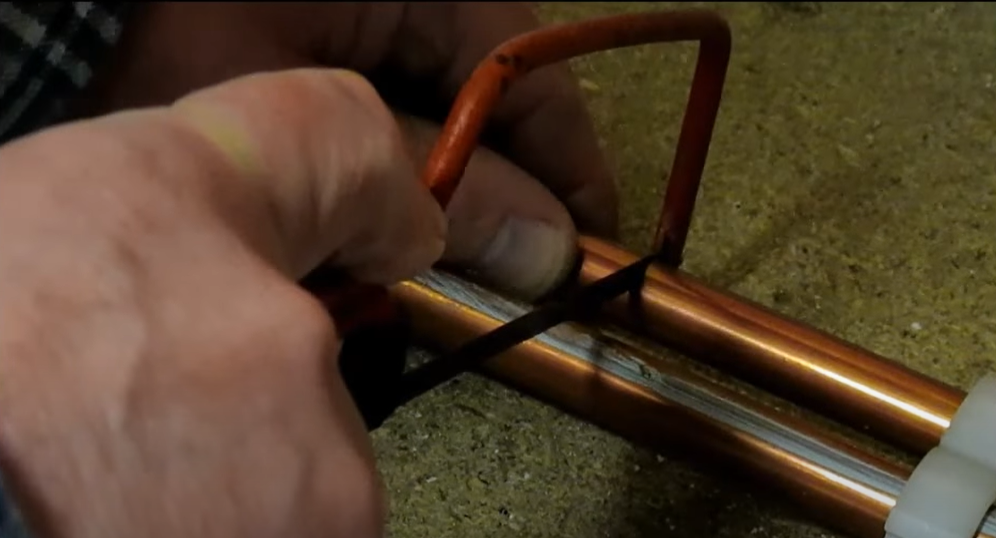
Step 1: Preparation: Gather the required tools, including a hacksaw, clamp, and a marker or Sharpie.
Step 2: Secure the Pipe: Clamp down the copper pipe onto a stable surface, ensuring it’s firmly held in place. This will prevent the pipe from moving while you’re sawing.
Step 3: Mark the Desired Cut: Measure the section of the pipe you want to cut, and mark it using the marker or Sharpie.
Step 4: Begin Sawing: Position the hacksaw at your mark and start to saw slowly and evenly. Use steady, consistent strokes.
Step 5: Saw Carefully: It’s crucial not to rush or force the blade. Moving too quickly or applying too much pressure can result in an uneven cut or damage to the pipe.
Step 6: Revisit Tough Spots: Some sections of the pipe may require multiple passes with the hacksaw to cut through completely. If you encounter resistance, remain patient and persistent.
Remember, while a hacksaw can be used to cut copper pipes, it may take more time and might not produce as clean and straight of a cut as some specialized pipe-cutting tools. However, in the absence of specific tools, a hacksaw remains a versatile and handy alternative.
Tools That Are Not Recommend For Cutting Copper Pipes
- Dremel
- Serrated knife
- Power saw:
- Heat torch:
- Plasma cutter:
- Reciprocating saw:
- Hammer and chisel
Tips & Warnings
- If you are using a saw, it is important to use a blade that is designed for cutting metal.
- When using a knife, you may need to make several passes in order to cut through the entire thickness of the pipe.
- If you are having difficulty cutting through the pipe, try heating it up with a torch. This will help to soften the metal and make it easier to cut.
- Be careful not to overheat the pipe, as this could cause it to warp.
- Always wear gloves and safety glasses when working with metal.
- If you are not confident in your ability to cut the pipe cleanly, you may want to practice on a scrap piece of the pipe first.
- Be sure to turn off the water supply before cutting the pipe. This will help to prevent any leaks.
- Make sure you have a sharp utility knife or copper pipe cutter. A dull blade will make the job harder and could damage the pipe.
- Score the pipe deeply enough that you are sure to cut through it. If you’re not sure, err on the side of scoring too deeply.
- If using a hacksaw, be careful not to damage the wall or obstruction.
- When using a copper pipe cutter, clamp it tightly onto the pipe before cutting. This will give you a cleaner cut.
FAQs
Why can’t I use a traditional pipe cutter in tight spaces?
Traditional pipe cutters often require more clearance around the pipe to rotate the tool properly. In confined spaces, there’s simply not enough room to maneuver them effectively.
Is it necessary to deburr the pipe after cutting?
Yes, it’s essential. Deburring removes rough edges and ensures a clean fit for connections, preventing leaks.
Can I use a hacksaw in tight spaces?
While possible, using a hacksaw can be challenging in confined areas, and it may not provide as clean a cut as a specialized cutter.
Do I need any special skills to cut pipes in tight spaces?
While no special skills are required, a steady hand and patience are essential. It’s also helpful to have some familiarity with the tool you’re using.
Is there a risk of damaging nearby pipes or structures when working in tight spaces?
Yes, there’s always a risk. Ensure you’re familiar with the surrounding area, and if possible, protect or isolate other pipes or structures to prevent accidental damage.
How can I prevent the cutter from slipping in tight spaces?
Ensure the cutter is properly aligned and clamped onto the pipe before starting. Apply consistent pressure as you rotate the tool.
What should I do if the cut is jagged or incomplete?
If the cut isn’t clean, you can try deburring the rough edge or using a file to smooth it out. If necessary, make a new cut in a slightly different location to ensure a proper fit.
Conclusion
Cutting copper pipe doesn’t have to be difficult- even in a tight space. By using a pipe cutter, tin snips, or a hacksaw, you can quickly and easily get the job done without any major headaches. Just remember to take your time, Measure twice cut once, and watch those fingers.


